


Beginner’s Guide for a Greenhouse
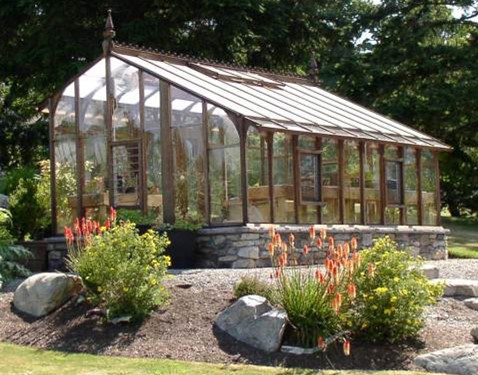
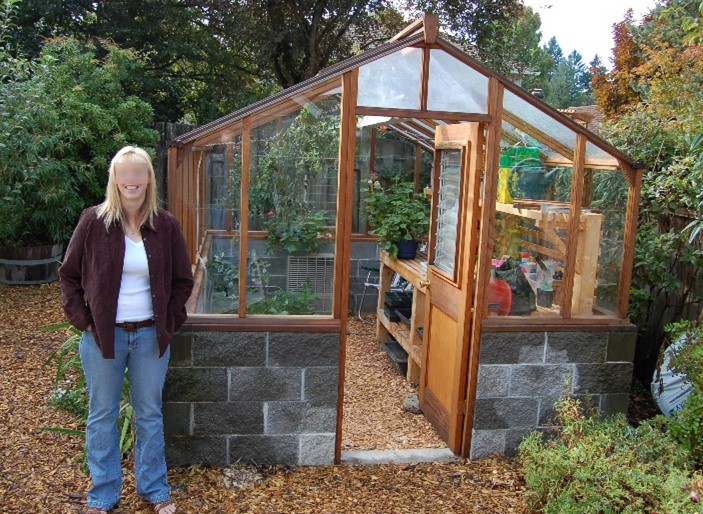
Do you want to add a greenhouse to your garden? A greenhouse provides many benefits such as a place for starts, to hang out, to grow and even for teach your love of gardening to others in your life. We own several greenhouses that have been here since the 1960’s, and each has its own charm and use – from growing herbs to succulents. Our greenhouses enable us to start our annual garden sooner, to have strawberries in the winter and to have two crops of Meyer’s lemons each year. The greenhouses have also served as meeting places for important conversations. Truthfully, we love and use our greenhouses far more than we ever anticipated!

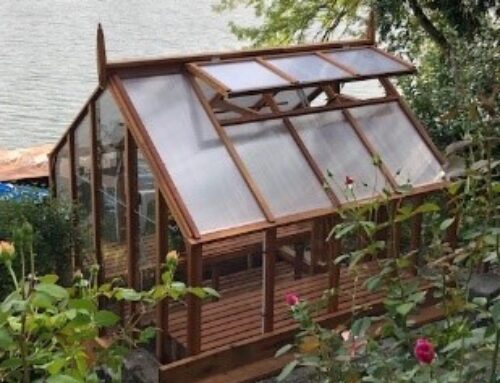
Figure 1 Sturdi-Built Nantucket Style Greenhouse
Benefits of Owning a Greenhouse:
- Provides a protected place for seed starts and other tender plants
- Extends the growing season
- Grow tropical, special and even rare plants such as Pineapple and Orchids
- Protects your plants from the many pests and other critters who may eat your garden
- Protect your plants from the all the weird weather around us
One might think owning greenhouse is as simple – just set the greenhouse up and start growing… Yes, setting the greenhouse up is a big step, but there are some decisions to make before setup that will ensure long term success. This article shares what we have learned and experienced after owning, supplying, building and tending hobby greenhouses.
If your goal is to creating a controlled, protected and sometimes more ideal climate than what is happening outside with a greenhouse, then combining available technology and your watchful eye will prevent most pitfalls of owning a hobby greenhouse – such as excessive heat or cold, too much humidity, insufficient light and even infestations pests and plant diseases.
Keep reading to learn more about choosing and using a home garden or hobby greenhouse. This article discusses hobby greenhouse styles, location, size considerations, foundation options, weather, climate control, and the importance of good airflow and ventilation.
What is a Greenhouse?
A greenhouse is a building designed for the protection of tender or out-of-season plants against excessive cold or heat. In the 17th century, greenhouses were ordinary brick or timber shelters with a normal proportion of window space and some means of heating. By the middle of the 19th century, the greenhouse had evolved from a mere refuge from a hostile climate into a highly controlled environment, adapted to the needs of particular plants. Large greenhouses are important in agriculture and horticulture and for botanical science, while smaller structures are commonly used by hobbyists, collectors, and home gardeners. [i]
Greenhouses can be freestanding, lean-to another structure and even attached at the end to another structure.
Modern greenhouses are typically glazed (covered) with glass or plastic that is held by a minimalist frame – a frame that by design, maximizes the natural light by limiting shadows. Sunlight enables your plants to photosynthesize and grow. Sunlight warms the soil and air, while the glass walls and roof trap the sunlight’s warmth, keeping the greenhouse several degrees warmer than outside.
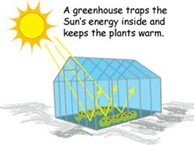
Figure 2The greenhouse effect. Image by NASA.
This is especially important during cold winter weather and overnight. A modern greenhouse includes automated venting to permit excess heat to escape. Plastic is another form of popular lower cost glazing.
We prefer glass glazing over plastic, most importantly being that it is safer on our environment to manufacture. Plastic can become brittle, may yellow, may shrink over time and may not be strong enough to strengthen the greenhouse structure. Environmentally, glass is easy to recycle and plastic is a whole other matter when it comes to recycling. Aesthetically, looking at a clear glass sided greenhouse has more appeal than a plastic sided version. Plastic is sourced from oil and glass is sourced from sand (yes, the same sand from a sand box or beach). Plastic can crack and scratch, glass can break, and glass can be tempered – safety glass. For each of these reasons, I prefer glass.
Greenhouse Options
When choosing a greenhouse, the options are seemingly endless! There are different styles, shapes and sizes to serve a wide variety of needs, spaces and climates. From simple tents to ornate buildings. Some framed with plastic others with wood or metal. For example, a table-top greenhouse or cold frame may be the perfect choice for someone that only dabbles in gardening.
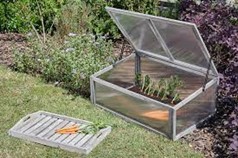
Figure 3 Cold Frame from Gardeners World
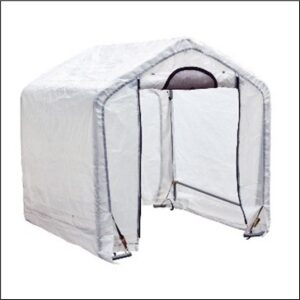
Figure 4A Tent Greenhouse Harbor Freight
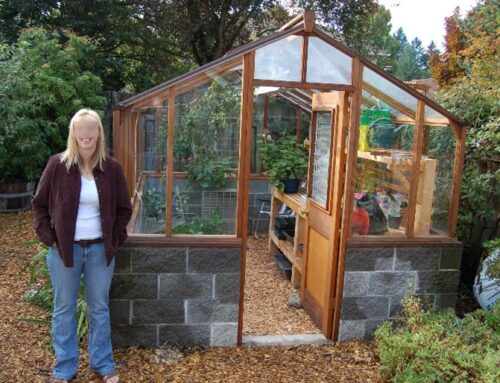
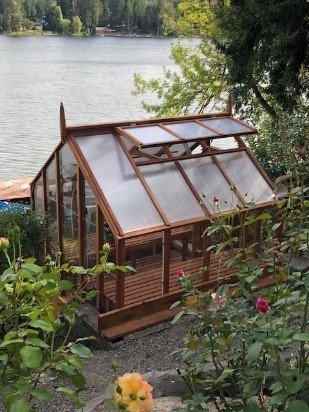
A step-up from a cold frame is a larger (but still portable) are tented greenhouses, enclosed with plastic – ideal for a gardener with a limited amount of growing space, or little need to keep plants protected for just one season. A limitation of each of these solutions is long term durability. A small greenhouse like a 7×7 on a good foundation can last for decades and add to the look of your garden.
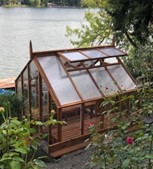
Figure 4B – Sturdi-Built Trillium 7×7 Freestanding Greenhouse in Washington State
Skilled and handy gardeners may choose to make their own greenhouse! A DIY greenhouse design can be as simple as securing sheets of specialized plastic over a frame of large hoops, or as intricate as puzzle-piecing together collected vintage windows into a cohesive little house. What is not easily apparent are the details of managing condensation in a greenhouse, providing hands-free automatic venting, keeping bugs and critters out, and maintaining a great growing environment year around. The costs for materials may surprise you and a more straightforward, fool-proof option is needed.
Hobby greenhouse kits are a great choice for a modest home garden, modern homestead, or even a mini-farm! Greenhouse kits are available in many sizes and styles to meet your needs, designed for convenience and easy use. No matter your greenhouse of choice, kit or homemade, you will need to consider how to provide adequate airflow and temperature control. Also, how to secure it.
Greenhouse Rules – There Are Few Rules!
If you live in a Homeowners Association (HOA) there may be size, height or setback rules. Cities and county building departments may have rules too: Permits may be needed if your greenhouse is larger than a minimum size (say 200 square feet) or if the greenhouse attaches to a building. In some jurisdictions, engineering calculations may be required to prove that the greenhouse will survive severe weather or earthquake. Please note, from a building code perspective, a greenhouse is defined as a horticultural space, it is not a living space.
Most other rules for greenhouses are guidelines. It’s your space and your choices. This guide helps to understand choices and outcomes when creating a greenhouse. For example, you may think a concrete floor is desirable, but a concrete floor needs to have a drain for excess irrigation water to go, and as the greenhouse warms, any consistent flow of water can become slimy, and become a slip hazard. Floor mats can overcome this risk. Another set of rules are usage:
- If your neighbor wants you to watch her plant while she is away, the answer may be No, we do not want your critters from your plant in our greenhouse”
- If your friend walks into your greenhouse wanting smoke tobacco there is a tobacco virus that effects plants, such as tomatoes.

Figure 5A – Tobacco Virus on Tomatoes (garden answers)
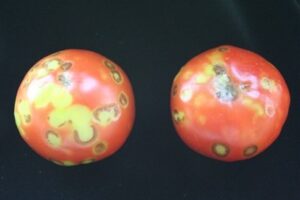
Figure 5B Tomato Photo from University of Utah
Greenhouse Size
When anyone asks for our advice on greenhouse size, we paraphrase from many of the wonderful books written by greenhouse owners – “My first greenhouse was what I could afford, but I quickly outgrew my first greenhouse and wished I had purchased a larger size.” Of course, there may be limits to the space for your greenhouse or limits to your budget. For example, if you are choosing between a 7’×7’ and a 9’×12’ greenhouse, go with the larger size if you can! You will fill your greenhouse and use the space!
Greenhouse size is expressed in two ways. By the square feet on the floor, and the cubic space inside. The cubic feet inside is a function of how tall the greenhouse is. Do you have tall plants or trees? Is the roof high enough to stand inside? Having to stoop down to work inside a small greenhouse may get old after time. Taller wall heights in a greenhouse will permit you to grow taller plants, even small trees.
To know what size greenhouse will work best for you, first consider where you want to put the greenhouse, how close the location is to sources or water and electricity, how close the location is to your kitchen and how much sun or inclement weather it will be exposed to. Smaller greenhouses typically have narrow doors and limited space. If you are leaning towards a smaller greenhouse, will your wheel barrow or hand truck will fit through the door. Will there be enough space inside for more than one person?
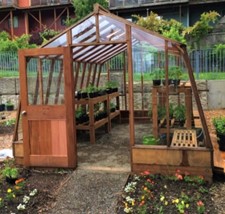
Figure 6 – Sturdi-Built Solite Greenhouse with 36″ wide Door
Here’s some more usage considerations when thinking about size: Do you want space for you – say for chair and table – place to have a quiet cup of tea? Do you need space to overwinter potted plants, like a Meyers Lemon? Do you need a place to store your soils, etc., to do potting and to even clean your pots?
Interior Design & Use of Space
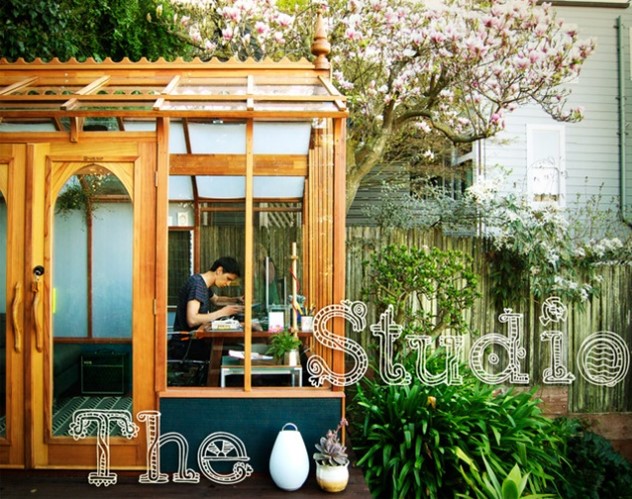
What do you want to use your greenhouse for? Online there are many customer examples at Sturdi-built that illustrate options. The process to design the inside of your greenhouse follows the same process as designing a room.
Start with a drawing of the inside of the greenhouse – say a rectangle with the length and width noted. Then not on the drawing the door, showing the door swing (in or out). Identify on the paper a compass showing north, so you know the antimyth of the sun in the summer. Next add the primary wind direction(s). Add any opening windows to create a comfortable working space, and cool the greenhouse. Make some copies so you can model different interior layouts.
Visualize how you’d like to use the inside of your greenhouse. Layout the inside – Draw in where any benches or wall shelves will be. Will there be an L-shape or U-shape bench layout, or just benches on the two sides? Will there be any benches in the middle of the greenhouse (for wider greenhouses). Note the types of benches: Single tier (just a top), a rack of some type, or two-tier benches with a top and shelf below. Will you want a sink inside for cleaning pots? How about a potting bench?
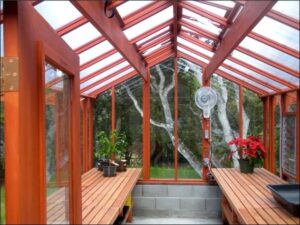
Figure 7 – Sturdi-Built Garden Deluxe inside
Some gardeners choose to enclose raised beds inside their greenhouse. Raised garden beds can permit roots to go into the ground below. The greenhouse provides a ‘tent’ over the growing raised beds. Most raised beds and grow boxes will need the soil amended before each season. When tilling the soil in a raised bed determine will there be enough room between the roof and the top of the raised bed, so a shovel can be used without breaking the greenhouse glass? Another consideration with a raised beds are critters coming into the raised bed from below – consider adding galvanized screening on the bottom of your raised beds to prevent this, and even add some weed block to keep volunteer plants and trees from joining the fun.
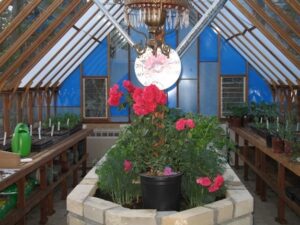
Figure 8 – Sturdi-Built Tudor Greenhouse with Raised Beds in center
Do you have hanging baskets? A greenhouse is great for overwintering flowering baskets, starting and even keeping some baskets there all the time. The roof of the greenhouse needs to be sturdy enough to support the weight of the baskets including any water weight. Greenhouses framed with wood or metal may be the better choice. Wood framing is easier to attach plant hanging bars.
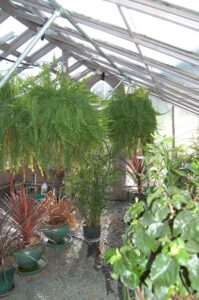
Figure 9 Sturdi-Built Garden Deluxe greenhouse with Hanging baskets
Location
Choosing a location for your greenhouse may be simple for you or full of choices. If your garden is so well planned and mature that there is only one space, then that decision was ‘easy’. If you have alternative spaces, then consider the differences if each space. For smaller, mobile greenhouses, you don’t need to commit to much – but these structures may not last a full season, blow over, etc.
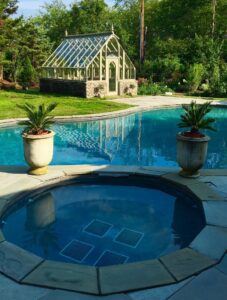
Figure 10 Sturdi-Built Tudor Greenhouse
For a more “permanent” greenhouse consider the following:
Sun
Choose a location for your greenhouse that receives full sun. Full sun during some part of the day is fine. Mid-day sun is best. Most plants need light, some prefer shaded or indirect light. It is easy to provide shading if necessary, and just as easy to add LED lighting that uses the proper light spectrums for with plant growth. Consider how the sun exposure or shadows will change throughout each season. Will any trees will grow taller to cause shade, need to be trimmed, or removed at some point.
Weather Weirding
If your location is prone to high wind gusts or powerful storms, heed some caution here. We have heard many horror stories about how more fragile greenhouses become toppled, blown away or damaged in those events! We always discover the local wind and snow loads to inform us how we provide a solution that will deal with any heavy snow and/or high winds. Our favorite website that offers snow, wind and tornado loads for most locations is ATC Hazards by Location.
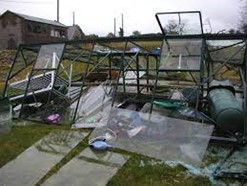
Figure 11 Storm Damaged Metal Framed Greenhouse (photo from Allotment Garden)
A Sturdi-Built Greenhouse we are require that our greenhouses are anchored to a foundation. When anchored, our greenhouse customers report that their structures have lasted 25, 30 and even 50 years. With some regular maintenance, and addressing any issues as the occur, the greenhouse should last for decades.
Protect your greenhouse from strong winds by choosing a semi-sheltered location. For example, tucked near the side of a house, fence, or other structure, rather than in the middle of an open field.
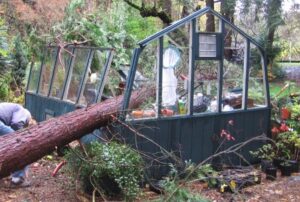
Figure 12 – Tree fall on a Greenhouse
At Sturdi-Built we strengthen greenhouse frames to meet the local climate needs. For example, for a customer in Astoria Oregon that sits where the mighty Columbia River meets the Pacific Ocean – that customer has wind gusts of 100 mph. Besides a masonry foundation we strengthened the greenhouse frame that look wonderful while adding strength.
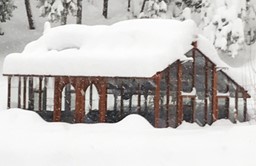
Figure 13 Sturdi-Built Nantucket Greenhouse in heavy Colorado Snow
Ease & Accessibility
Will you grow herbs or vegetables in your greenhouse? Most cooks want herbs nearby the kitchen, or perhaps down a path (verses through a field, or over a fence). Locate your greenhouse close to the home. Keeping it close permits makes easy to pop outside and check on your plant.
Greenhouses can be for those with disabilities. Do you have members of your household with abilities that limits mobility? A wider door may be needed, such as 35” or 36” and even a self-opening door. Door swing should be considered too – will you need to shovel snow to get into your greenhouse in the winter?
Easy access to water for irrigation is important – having a water spigot and even a sink inside is very helpful. Add a water wand on a hose inside also make watering easy. Avoid running a hose through a door way or thinking water cans are a good long-term solution – using a hose from the outside is both a tripping hazard and having your door is left open during watering allows for bugs and critters to get in.
Easy access to power to operate fans, heaters, heat mats and to even listen to tunes as your garden is a very wise choice. Running an outdoor extension cord has its dangers. Adding outlets inside your greenhouse allows you to do more inside your greenhouse, and to better control the growing environment.
Greenhouse Foundations
How long a greenhouse lasts is most influenced by the foundation. A foundation is the structure that supports and anchors the greenhouse frame and transmits the weight of the greenhouse directly to the earth below. The wisdom found in the Christian Bible goes like this: “He is like a man building a house, who dug deep and laid the foundation on the rock. And when the flood arose, the stream beat vehemently against that house, and could not shake it, for it was founded on the rock (Luke 6:48)”
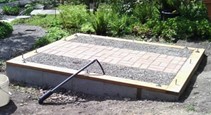
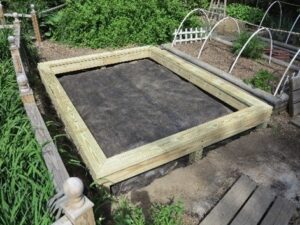
Figure 14 – Foundations for Greenhouses, Masonry with wood Mud Sill (left) and Treated Timber (below)
If your greenhouse has no foundation, then that means there is minimal anchor into the ground. You may even have to say goodbye greenhouse during the next storm.
For your greenhouse to last for decades, install your greenhouse on a sturdy, level and square foundation. The foundation provides the base to anchor the greenhouse to, so the greenhouse stays in place during storms and earthquakes. A foundation also helps to reduce unwanted entry by vermin and pests. The foundation may also raise your greenhouse over the soil level – so the side wall glass is less exposed to rocks when mowing or trimming is being done nearby. It is not a good idea to set your greenhouse directly on the ground for these reasons.
There are many options for foundations. Some of the more popular foundation materials for greenhouses include treated timbers, deck surfaces of all types, poured concrete footings, piers, cement blocks, pavers, and concrete slabs. Wood is likely the most inexpensive and easy to work with. An existing concrete patio could make a great level foundation! However, keep in mind that water may not have anywhere for water to drain to.
Before selecting your type of foundation its good to know the soil at your location – sandy, rocky, loam, well drained, marshy, etc. Does the soil expand in the winter with moisture? Is the greenhouse on a slope? Asking a local contractor or your local building department may provide some best practices. Let the person know that this is for a horticultural structure, not a home. Larger greenhouses that are heavy need masonry foundations. Smaller greenhouses can use treated timber foundations.
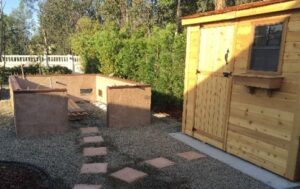
We built several of our greenhouses on a treated timber foundation in a bed of ¾-minus gravel, and staked down with 1” galvanized water pipe stakes. Other greenhouses on site are built on poured concrete footings with a wood mudsill on top. Each of these foundations have weathered time, earth quakes, and storms at our location.
Sometimes a concrete or block wall is also installed on the foundation, that becomes a basewall or knee wall for your greenhouse. Many like the look, durability, and also that we could build it up high enough to get above the typical snow height.
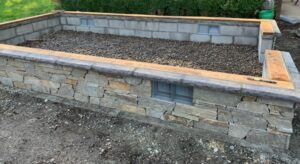
Figure 15 – Sturdi-Built Greenhouse – Foundation Sample in Oregon
Securing Your Greenhouse
No matter the type of foundation you choose, how you connect the greenhouse to the foundation is very important. If not properly secured, a greenhouse can easily get overturned in a strong wind, shift off the foundation in an earthquake or moved by some other means. For example, our greenhouses are anchored to foundation with anchor bolts into a concrete foundation and 2 ½” screws for treated timber foundations. Staking a greenhouse into the ground will likely not be secure enough during a weather event.
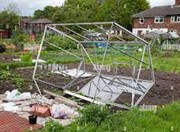
Figure 16 – Greenhouse blown off foundation (left) and Foundation and Basewall with bolts ready to accept frame (Below)
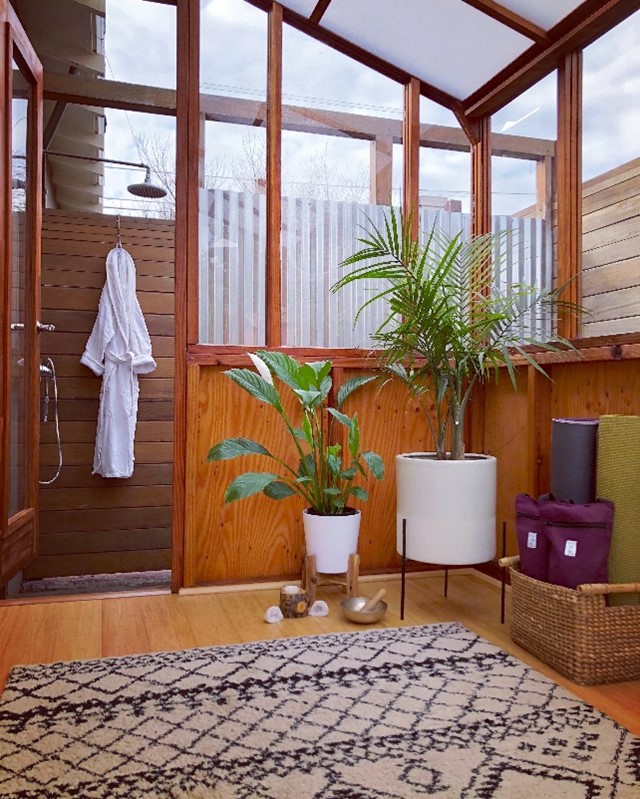
Flooring Options
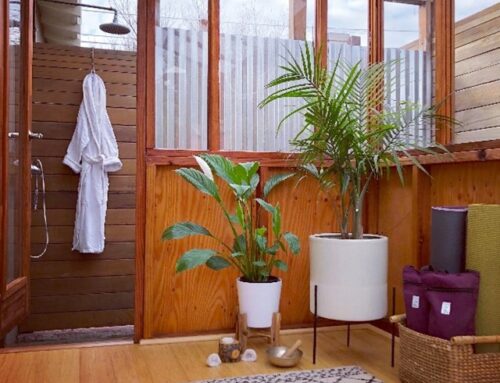
Once you have your foundation figured out, then the next step is select flooring for inside the greenhouse. Flooring choice depends, in part, on what you will use your greenhouse for. If the greenhouse is to be a yoga studio or a dining area, then a nice interior grade floor can work. If the greenhouse is for growing, then the guidelines are: you only need to pave where you walk, and use gravel under any benches. Another consideration is where will water go as you irrigate? Keeping the floor porous is the best solution. Small rock material such as pea gravel is a popular choice inside greenhouses – but with this downside of walking away as the gravel gets stuck in most shoes.
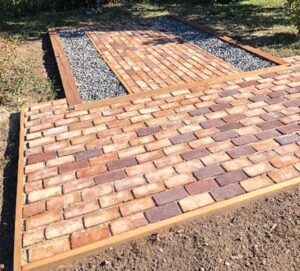
Figure 17 Greenhouse Floor Example
When the floor of our greenhouse is covered with several inches of gravel, the gravel can offer great drainage, but the gravel may be difficult to pull wheeled carts over. If the gravel is not packed, your feet may sink into the gravel and move when you walk on it. Adding stepping stones helps. Our favorite greenhouse floor is made from Home Depot or Lowes concrete pavers, laid without grout in a bed of gravel. Its functional, easy to travel over and sweeps clean.
Before installing the floor, put weed block landscape fabric and galvanized wire for moles and vole protection over the native soil. Some customers use layers of cardboard below a rock floor instead, but the cardboard will break down and will not provide protection for moles and gophers.
Benches and Shelves
The most practical greenhouse benches and shelves are slotted, allowing air circulation and water drainage from plants and containers. Many greenhouse kits offer shelves and benches, but you can buy them separately or repurpose other shelving units or tables you already have. Conversely, you could build you own! In this article shelves are narrow wall shelves. Benches stand on the floor of the greenhouse.
Sturdi-Built offers custom wood shelves and benches to fit perfectly inside your greenhouse. Since any wood inside a greenhouse will be exposed to moisture, choose a type of wood that is durable and naturally rot-resistant. Our benches are heart redwood.
Metal shelving units (rust-resistant) are another popular option for greenhouse shelves, or wire over wood table frames. Wire fencing over a frame will need support in the middle, to hold heavy plants and prevent sagging. Some wire racks have the benefit of being adjustable or stackable, making it easy to rearrange your shelving depending on the season or types of plants inside. Keep in mind that wall shelves on the south, east or west side of a greenhouse will block the sun and cast a shadow inside.
Climate Control
A greenhouse is the key to growing in a pest free, well lighted, controlled temperature and humidity environment. Technology provides the tools to control all these elements. Think of the technology as tools, and every tool has a purpose. Say you wanted to grow a place with lots of bugs, frigid winters and hot long summer days. For most, the goal is to keep the temperature inside the greenhouse as between a narrow range of temperature.
Thermometer/Hygrometers – In order to monitor the internal conditions of your greenhouse, it is extremely helpful to have a wireless or Bluetooth thermometer/hygrometer inside. We love to solutions from ThermPro. A wireless sensor portion stays inside the greenhouse, while the rest of the unit is inside your home or garage, or on your phone. This makes it easy to keep an eye on things remotely! You can also add additional sensors to monitor multiple zones inside larger greenhouse, such as the greenhouse versus outside.
Keeping a Greenhouse Cool
When the hot sun shines into your greenhouse, the greenhouse can easily become too hot for the plants inside – and even burn or kill them. Yes, plants can be sunburned.
Ways to keep your greenhouse cool (not all are effective):
- Open a Door. Prop open the greenhouse door on hot days – not the best idea, as an open door invites pests inside. If you choose to leave your door open, close it before the sun goes down, to trap a little warmth for the night.
- Automatic Roof Vent Openers. Have roof vents that automatically open. When the temperature inside is warn, an automatic roof vent is easy and dependable. If you have a manual roof vent to allow hot air to escape that’s ok too. The Bayliss automatic vent opener offered by Sturdi-Built greenhouse opens at around 70F and closes again when it cools down.
- Circulating Fans – Use circulating fans to provide good air circulation and wind tension for plants. The fan moderate’s temperature by circulating the air inside.
- Exhaust Fans – These fans evacuate warm air to hopefully replace the air inside with cooler air from outside. These fans should be controlled by a thermostat. The exhaust fans come in various sizes. Exhaust fans need intake vents that open when the fan turns on.
- Shade cloth – Installed on the outside inside the greenhouse and made to fit is the best solution. Shade cloth is available in different densities, ranging from 47% to 80%. Shade cloth should be removable – so it can be removed in the late fall and put back on in spring.
- Keeping the Fan on and Floor Wet. Wet the inside of the greenhouse surfaces, such as the floor, paths, inner foundation, and even benches or shelves with water. Turn on your circulating fan. As the added moisture evaporates in the heat, it raises humidity and naturally cools the air inside the greenhouse.
Providing Warmth
A greenhouse’s glass walls and roof are excellent at trapping heat inside while the sun is shining, but they are not good at providing insulation when the airmass is cold outside. For that reason, greenhouses can rapidly lose heat at night. Depending on the greenhouse, it will keep the temperature inside a couple of degrees warmer than it is outside at night, but not much more than that.
In the winter or on colder nights, heaters can raise the temperature inside. The glazing on the greenhouse has the lowest R-value, so most heat is lost through the glass. Sturdi-Built’s thermal option is one method to improve a greenhouse’s R-value.
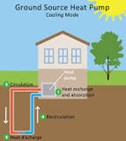
Heat Pumps – One of the most overlooked sources for cooling and heating is geothermal heating and cooling. Geothermal technology harnesses the Earth’s heat. Just a few feet below the surface, the Earth maintains a near-constant temperature, in contrast to the summer and winter extremes of the ambient air above ground. This is a low-cost solution for cooling in the summer, and in the winter, you only need to heat above the constant temperature from your ground – lower heating cost.
Thermal Mass – When a greenhouse has a southern facing, having a concrete wall or barrel of water can become heat mass – that warms in the day and slowly cools off the night. Glass and plastic aren’t great at retaining heat, but some other materials are! Large volumes of water or big solid objects such as concrete blocks are excellent at absorbing and retaining heat – staying warm for many hours after the sun has passed. To take advantage of thermal mass heating, many gardeners store large drums or tanks of water inside their greenhouse as a means of frost protection. The drums are often black in color, and stored in a location in the greenhouse that receives a lot of direct sunlight. They absorb heat and energy during the day and then re-radiate that heat back out to the surrounding air at night as the temperatures drop. Frost is rare where we live, but our stone foundation serves as some thermal mass!
Insulation – The location of your greenhouse may provide some natural insulation, such as near a fence or house. A wall may also re-radiate some heat back towards the greenhouse in the evening. Additional insulation can be provided around the outside of a greenhouse, lining the inside of the walls, or directly over the plants themselves – including frost blankets, specialized greenhouse insulation material, or even bubble wrap! Also, a greenhouse full of plants will retain more heat overnight than a virtually empty one.
Heat Mats – With an available power source, we also use heat mats under trays of seedlings to keep the soil warm at night as needed.
Heaters – Electric heaters that are splash proof are available from BioGreen USA and gas heaters are available from Empire. Ensure your heater has a thermostat.
And that completes your overview of a hobby greenhouse.
Our thanks to Deanna Cat whose blog inspired this how to guide
[i] Source: Encyclopedia Britannia

Leave A Comment